How to Build an AI Chatbot for Your Website (Step-by-Step Guide)
A few years ago, adding a chatbot to a website was considered an advanced feature. Today, it has become almost essential for businesses that want to provide fast and efficient customer support.
Users expect instant responses. They do not want to wait for emails or callbacks. This is where AI chatbots make a real difference.
In this guide, you will learn how to build an AI chatbot for your website step by step, using simple tools and practical methods that developers actually use in real projects.
What is an AI Chatbot?
An AI chatbot is a software application that can understand user queries and respond in a conversational way. Unlike traditional chatbots that follow fixed scripts, AI chatbots use natural language processing to understand the meaning behind a message.
This allows them to handle dynamic conversations instead of just predefined answers.
Why Your Website Needs an AI Chatbot
Adding a chatbot to your website can provide several benefits:
- Instant replies to customer queries
- 24/7 availability without human support
- Improved user engagement
- Higher conversion rates
- Reduced workload for support teams
For businesses, this means better customer experience and more opportunities to convert visitors into customers.
Step 1: Define Your Chatbot’s Purpose
Before you start building, it is important to clearly define what your chatbot will do.
Some common use cases include:
- Customer support
- Lead generation
- Product recommendations
- Answering frequently asked questions
Having a clear goal will make development much easier and prevent unnecessary complexity.
Step 2: Choose the Right Technology Stack
You do not need a complicated setup to build a chatbot. A simple stack works well:
- Frontend: React or Next.js
- Backend: Node.js with Express
- AI Engine: OpenAI API
- Database (optional): MongoDB or Firebase
This combination is flexible, scalable, and widely used.
Step 3: Get API Access
To power your chatbot with AI, you need access to a language model API.
Basic steps:
- Create an account on an AI platform
- Generate an API key
- Store it securely in environment variables
This key will be used to send user messages and receive AI-generated responses.
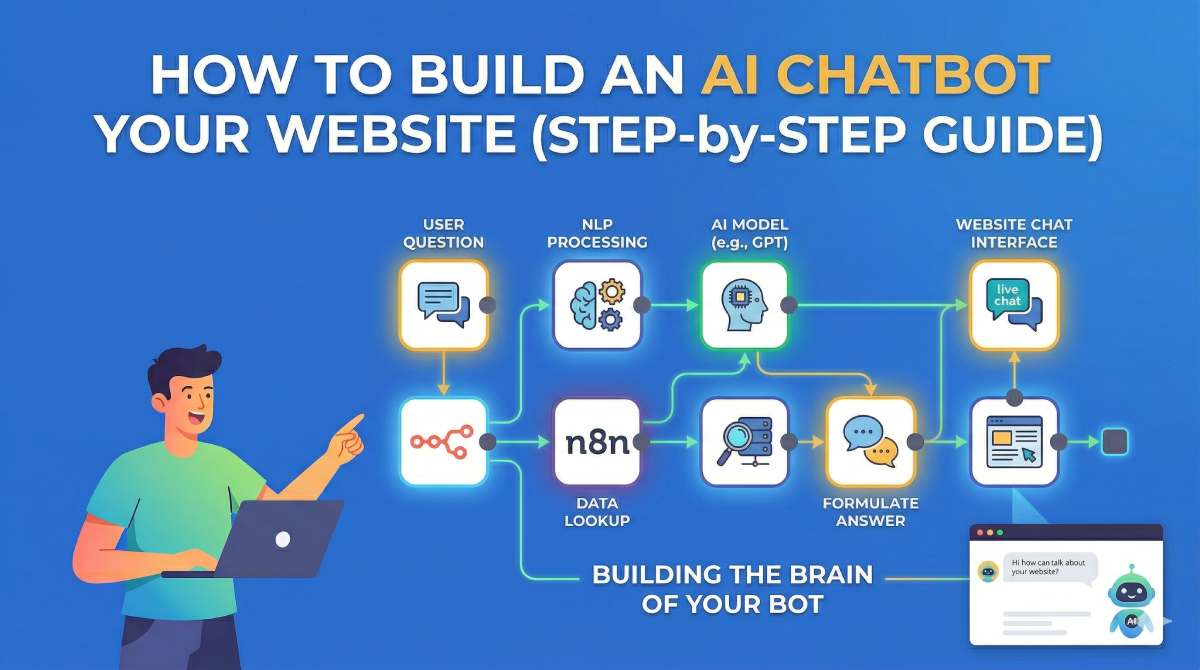
Step 4: Build the Backend API
The backend acts as a bridge between your website and the AI service.
Here is a simple example using Node.js:
import express from "express";

import fetch from "node-fetch";


const app = express();

app.use(express.json());


app.post("/chat", async (req, res) => {

  const { message } = req.body;


  const response = await fetch("https://api.openai.com/v1/chat/completions", {

    method: "POST",

    headers: {

      "Authorization": `Bearer ${process.env.OPENAI_API_KEY}`,

      "Content-Type": "application/json",

    },

    body: JSON.stringify({

      model: "gpt-4o-mini",

      messages: [{ role: "user", content: message }],

    }),

  });


  const data = await response.json();

  res.json({ reply: data.choices[0].message.content });

});


app.listen(5000, () => console.log("Server running"));
This API receives user input and returns an AI-generated response.
Step 5: Create the Chat Interface
The frontend is what users interact with. Keep it simple and user-friendly.
Your chat UI should include:
- A chat window
- An input field
- A send button
- Message history
A clean and responsive design improves user engagement significantly.
Step 6: Connect Frontend and Backend
Now connect your UI with the backend API.
The flow works like this:
- User types a message
- Message is sent to backend API
- Backend sends it to AI service
- Response is returned and displayed
This creates a real-time chat experience.
Step 7: Customize Your Chatbot
To make your chatbot more useful, you should customize its behavior.
You can do this by adding a system prompt, for example:
You are a helpful customer support assistant for an online store.
This helps the chatbot respond in a consistent and relevant way.
Step 8: Add Knowledge Base (Advanced)
If you want your chatbot to answer based on your own data, you can connect it to a knowledge base.
This may include:
- PDF documents
- FAQs
- Product details
- Internal documentation
This approach is often called Retrieval-Augmented Generation and makes the chatbot far more accurate.
Step 9: Integrate Chatbot into Your Website
You can add the chatbot in different ways:
- Embed script
- Direct integration in your frontend code
- Widget-based floating chat button
A floating chat widget is the most common approach.
Step 10: Security and Optimization
Before going live, make sure your chatbot is secure and optimized.
- Protect API keys
- Add rate limiting
- Validate user input
- Monitor usage and logs
This ensures stability and prevents misuse.
Common Mistakes to Avoid
- Building without a clear purpose
- Adding too many features at once
- Ignoring user experience
- Not handling incorrect responses
Keeping things simple and focused usually leads to better results.
Conclusion
Building an AI chatbot for your website is now easier than ever. With the right tools and a clear plan, you can create a powerful chatbot in a short time.
Start with a simple version, test it with real users, and improve it over time. The most successful chatbots are not the most complex ones, but the ones that solve real problems effectively.